Approximately 10 Things to do After Installing Fedora 36 on your Framework Laptop


Table of contents
- 1. Update your system
- 2. Framework specific-ish tweaks and fixes
- 2.1 Enable fractional scaling
- 2.2 Enable tap-to-click
- 2.3 SSD Power Saving Workaround
- 2.4 Enable Keyboard Brightness Controls
- 3. Enable RPM Fusion repositories
- 4. Install Your Favorite Text Editor
- 5. Configure DNF
- 6. Install Multimedia Codecs
- 7. Change Your Hostname
- 8. Enable Flatpak
- 9. Install Gnome Tweaks
- 10. Install Some Extensions
- 11. Enable Your Fingerprint Reader
- Conclusion
Fedora is a popular linux distribution, and Framework is the cool new up and coming startup manufacturing repairable, upgrade-able laptops. Framework also lists Fedora 36 as one of the best supported distributions for their laptops. Sounds like a match made in heaven, right? Well, almost.
While Fedora 36 works quite well on Framework laptops quite well out of the box, there are a few tweaks needed to get it running perfectly. Along with a few required tweaks for complete base functionality, there's a few more steps that will go a long way to ensuring your system works great for you right away, and stays that way long into the future.
Even for those of you without a Framework laptop, this guide will work much the same. I will point out when a step is specific to Framework devices.
1. Update your system
This goes for any operating system you install. The very first thing you should do after booting it up for the first time, before even opened up firefox to browse the web, is do a full system update.
Fedora uses dnf for its package manager by default, so that is what we will use here.
sudo dnf upgrade
Type the above into your terminal, enter your password, and in a moment you should see a list of the packages that will be upgraded.

Your list will likely be much longer, but should look about the same. Be sure to type "y" then hit enter. Give it some time, and your system will be updated!
2. Framework specific-ish tweaks and fixes
Fedora 36 works very well on Framework out of the box, however this section will outline a few steps to get it working just right. If you do not have a Framework laptop, some of the content in this section may or may not apply to your specific device. I will do my best to outline when a certain step may apply to non-framework devices.
2.1 Enable fractional scaling
By default, Fedora 36 does not support fractional UI scaling. This means you can only scale by increments of 100%. This isn't an issue specific to Fedora or the Framework laptops, but is problem with the Gnome desktop environment. Nonetheless, the Framework laptop uses a high resolution display (2256x1504, Go 3:2!) while remaining only 13 inches. This leads to the problem of everything being far too small at 100% scaling, but far too large at 200% scaling. Most operating systems solve this by letting you scale in smaller increments, such as 125%. If you have a Framework laptop, or a laptop with an especially high resolution display, this should solve your problem.
gsettings set org.gnome.mutter experimental-features "['scale-monitor-framebuffer']"
Inputting this into a terminal, then rebooting, will enable fractional scaling. After rebooting, open up the gnome settings, navigate to "Displays", then click "scale" and choose your preferred option. I believe 125% is a good starting point for Framework laptops.
One thing to keep in mind is not all applications work well with UI scaling. Some programs, especially older ones, will not look quite right. The alternative to UI scaling that I found worked quite well for me is to set scaling to 100%, and enabling "Large Text" under "Accessibility". More apps will respond correctly to the system font configuration, and I personally find both of these options to leave my UI feeling just about right.
Experiment with the options and get it feeling just right for you.
2.2 Enable tap-to-click
This is a much simpler concept, and there is two methods of enabling it. Like it sounds, this feature will allow you to click by simply tapping your touchpad instead of having to fully depress the button. Most laptop users will probably want this enabled, however it is up to you. For those of you looking to enable it, there are two methods. You can use the terminal, or the settings gui applications.
Method 1: Terminal
Enabling tap to click in the terminal is as simple as typing this command into the terminal and hitting enter:
gsettings set org.gnome.desktop.peripherals.touchpad tap-to-click true
After doing so, you should have no trouble using tap to click.
Method 2: Settings gui application
Enabling tap to click with the builtin settings application is simple, but takes a few more steps.
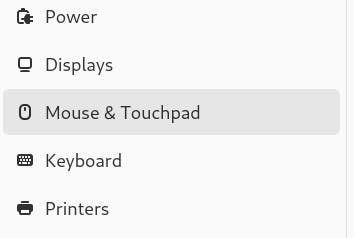
First thing, click the utility bar in the top right of your display. On the drop-down that appears, click "settings". Once the settings app opens, you will want to click "Mouse and Touchpad" on the left column, as shown:
From there, you will see "Tap to Click" within the "Touchpad" section, as shown:
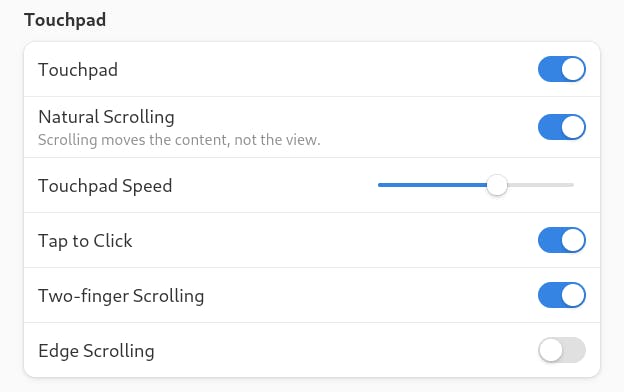
Once toggled on, tap to click should be functional on your system.
2.3 SSD Power Saving Workaround
This is a problem that only applies to Framework users, and only to certain ones. If you are using the WesternDigital SN750 SSD, you may need to apply a simple tweak to improve power efficiency when in suspend mode.
To do so, open your terminal and type the following command:
sudo grubby --update-kernel=ALL --args="nvme.noacpi=1"
You may be prompted to enter your password, and then you are done!
2.4 Enable Keyboard Brightness Controls
This is also a problem specific to Framework users. By default, Fedora 36 ships with automatic brightness enable through use of ambient light sensors. The problem is this block the use of the keyboard brightness controls built into your Framework. If you would prefer to leave your brightness automatic, you may skip this section. If you would like to disable automatic brightness and instead gain functionality of your brightness controls, type the following command into the terminal:
sudo grubby --update-kernel=ALL --args="module_blacklist=hid_sensor_hub"
You may be prompted to enter your password, and then you are all done!
3. Enable RPM Fusion repositories
By default, Fedora 36 does not come with all the repositories enabled. This will be the case no matter what hardware you are using. You will notice if you attempt to install proprietary software like Discord or Steam, you won't find any matching packages. RPM Fusion repositories come in two maim varieties: Free and Non-Free. The terms "free" and "non-free" in this context do not refer to pricing, but rather "free" is used as in "freedom". As such, the Free repo includes only open source software that Fedora is unwilling to ship by default for various reasons, their policy for such is outlined here, and the Non-Free repo includes software which cannot be considered open source, such as Steam or Discord. Note that these non-free software examples are still free-of-charge to install, but not necessarily free as in freedom.
In order to enable both repos on your system, paste the following command into your terminal:
sudo dnf install https://mirrors.rpmfusion.org/free/fedora/rpmfusion-free-release-$(rpm -E %fedora).noarch.rpm https://mirrors.rpmfusion.org/nonfree/fedora/rpmfusion-nonfree-release-$(rpm -E %fedora).noarch.rpm
You may be prompted to enter your password, then you will be greeted with a screen similar to when you upgraded your system in step 1. Step through the process and wait until it completes. Now you have the full repositories active.
If you want to enable the Fusion repositories for use in the GUI software center that shipped with Fedora, you will also want to type this command into the terminal:
sudo dnf groupupdate core
4. Install Your Favorite Text Editor
You will likely want to install your text editor of choice. Fedora 36 ships with a new basic text editor simply named "Text Editor" and it is enough to get you by, but you will likely want something a little bit more powerful. Feel free to install any editor of your choice. Below I will go over installing Vim and VSCode.
4.1 Installing Vim
Installing vim is quite easy. Open up a terminal and type:
sudo dnf install vim
It will step through the install process and after a few moments you are all done! Type vim *filename* to start editing a file. If you aren't familiar with Vim but would like to check it out, consider reading my other article: Vim is really good!
4.2 Installing VSCode
Installing VSCode is a bit more involved than Vim. By default, it isnt available in the repositories to be installed by DNF. Borrowed from visualstudio.com, you first must type this into the terminal:
sudo rpm --import https://packages.microsoft.com/keys/microsoft.asc
sudo sh -c 'echo -e "[code]\nname=Visual Studio Code\nbaseurl=https://packages.microsoft.com/yumrepos/vscode\nenabled=1\ngpgcheck=1\ngpgkey=https://packages.microsoft.com/keys/microsoft.asc" > /etc/yum.repos.d/vscode.repo'
This will install the necessary repository onto your system. Once that is complete, you can simply type the following into your terminal:
sudo dnf install code
You may be prompted to enter your password, and follow it through the installation process.
5. Configure DNF
Dnf is the package manager Fedora uses by default. Out of the box it works just fine, but there are a few tweaks that will help it function a bit smoother.
You will want to open up /etc/dnf/dnf.conf in your favorite text editor, such as Vim or VSCode. Once you are in that file, the contents should look something like this:
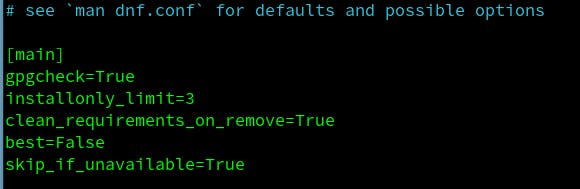
Create a new line with a comment such as # Custom settings and below it, you can enter some of the follow options. Full documentation can be found here, however below are some of my goto choices.
fastestmirror=True
This will ensure the dnf is always using the fastest mirror available for downloads. The next time you use dnf after adding this it will take a long time, however after that it should be much faster than before.
max_parallel_downloads=5
This will define how many downloads dnf will run at once. I set mine to 5 as a comfortable middle-ground, however if you have extremely fast internet, you can bump it up even higher.
defaultyes=True
By default, dnf will choose no as the default choice when downloading packages. With this setting it will default to yes, so you only have to hit enter at the prompts to proceed. This will make it work more similarly to how apt and pacman work out of the box. This is entirely optional, but is my preference.
keepcache=True
This will enable caching within dnf and should improve performance considerably, there's not really any downside to enabling this.
6. Install Multimedia Codecs
Due to not shipping with any proprietary software, Fedora will be missing some important things for multimedia playback out of the box. Downloading these is a simple matter of running the following two commands in the terminal:
sudo dnf groupupdate multimedia --setop="install_weak_deps=False" --exclude=PackageKit-gstreamer-plugin
sudo dnf groupupdate sound-and-video
Both were provided by the RPM Fusion website.
7. Change Your Hostname
Fedora gives you fewer options during installation than most linux distributions. One of the choices it takes away is configuring your device's hostname at install. To change it after the fact type this command into your terminal:
sudo hostnamectl set-hostname "New_Custom_Name"
Of course, replacing New_Custom_Name with whatever you'd like your new hostname to be.
8. Enable Flatpak
By default, Fedora 36 comes with flatpak installed, but the repositories are not all included. Pulled directly from flatpak.org simply type this command into your terminal:
flatpak remote-add --if-not-exists flathub https://flathub.org/repo/flathub.flatpakrepo
This will also enable you to install flatpaks from the GUI Software center included in Fedora.
9. Install Gnome Tweaks
The default settings application that ships with gnome offers quite a few ways you can tweak your system, but it does lack some more detailed changes. Installing the package "Gnome Tweaks" can enable many more settings to mess with, such as enabling minimize and maximize buttons on your windows. To install it, simply type the following into a terminal:
sudo dnf install gnome-tweaks
You may be prompted to enter your password, and then follow the normal prompts.
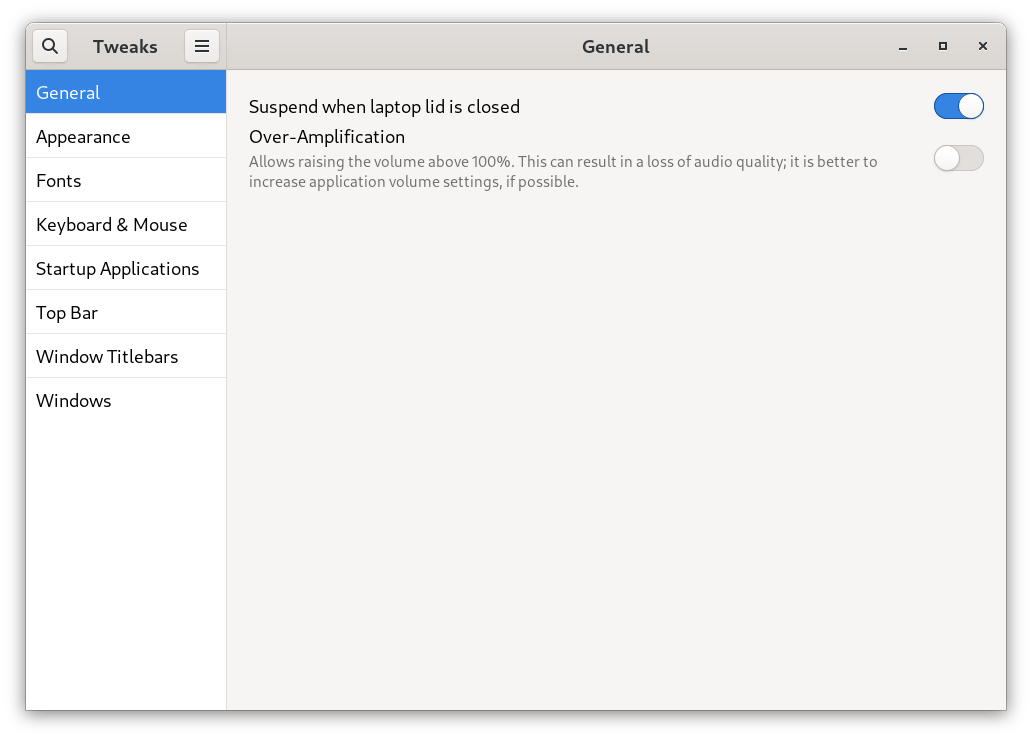
Once installed, you can open the GUI Application "tweaks" and be greeted by a window that looks something like this:
10. Install Some Extensions
One of the primary ways to customize Gnome, the default Desktop Environment that ships with Fedora 36, is through extensions. The easiest way to get started is by opening the Software Center, and searching for "extensions" and installing the package shown below:

Once installed, head on over to extensions.gnome.org and search for whatever you would like! Below are a couple extensions that I think many people may find useful:
Pop Shell: Pop Shell is a Gnome extension made by the folks over at System76, and it enables automatic window tiling on the gnome desktop. Pop Shell is actually installed with dnf as opposed to the gnome extension manager, but once installed is managed through the extension manager. To install it, type the following into your terminal:
sudo dnf install pop-shell
You may be prompted to enter your password, then follow the prompts.
Once install, head over to the gnome extension manager and ensure it is enabled as shown below:

Dash to Dock: You may notice when you open the "activities" menu, either by clicking activities in the top right, or pressing the super key (the windows key on most laptops, including the Framework laptop) a dock appears at the bottom of the screen, showing a few shortcuts and your currently running apps. If you'd like to enable this dock to be visible outside the activities menu, similar to the dock in MacOS, you'll want to install Dash to Dock. Head over to the gnome extensions website, and search for "Dash to Dock" and install the extension shown below:

Similar to PopShell, once installed be sure to check the extension manager to ensure it is enabled. Once installed and enabled, move your mouse to the bottom of the screen to reveal the dock, and customize it to suit your needs!
11. Enable Your Fingerprint Reader
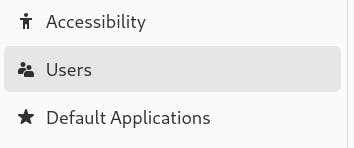
Your Framework laptop ships with a fingerprint reader, and while it isn't enabled by default, you may choose to enable it as an options for logging into your account and authorizing sudo commands. If you happen to be following this guide as a non-framework user, but still have a fingerprint reader, these steps should work the same for you. To do so, open up the settings app again, then towards the bottom of the left column select "Users" as shown:
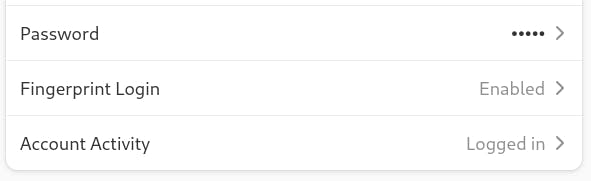
From there, select "Fingerprint Login" as shown on the right:
It will then step you through the process of registering one or more fingerprints into the system. Once complete, you should be able to login and authorize sudo commands using only your fingerprint!
Conclusion
Once you've followed all the steps above, your system should be ready to use! We've ensured all the important settings are configured, important tools and repositories are installed, and we have even customized the system a bit. From here, get comfortable in your new desktop, and explore around at the other extensions and settings you can mess with. While Gnome may not be as customizable as something like KDE, there is certainly a lot that can be done with it, so be sure to explore and experiment!